
Why Light Mood Food Photography Is So Important

Creating a light and bright mood in food photography can completely transform the way a dish is perceived. As a food photographer in Northamptonshire, I often work with restaurants and brands to showcase their offerings through professional restaurant photography and product photography for restaurants.
The key to a light mood image is combining neutral backgrounds, bright props, and controlled lighting to highlight the food itself.
How to Create a Light/Bright Food Picture
This is the process I prefer when taking a light/bright moody picture. The most effective lighting is one form of lighting, with bright or white props and a neutral background. Again, I would suggest reflectors bounce and diffuse shadows.

Light/bright mood photography moodboard example
I always form a visual mood board of google images that I feel keep to a theme or mood I am attempting to re-create for a client.
Here is an example of images I have found that represent bright/light food photography
The images taken are all clean, and the colour element is the food colour. Which makes the food stand out from the props and background. The composition used for these examples is the rule of thirds or golden triangles, with depth of field and flat-lay positioning.
Here are some key points to consider.
Use Neutral Backdrops and Props
Light-coloured surfaces and props keep the focus on the food, allowing its natural colours to pop. Whites, creams, and pale greys work perfectly to enhance your dishes.Control Lighting
Natural light is ideal, but studio lights can also be used with diffusers and reflectors to soften shadows. Placing your light source to the left, right, or even as backlight can create a clean, bright aesthetic.Composition Matters
Using composition techniques such as the rule of thirds or the golden triangle guides the viewer’s eye toward the main elements of the dish. This ensures your food photography looks professional and visually engaging.Angles and Depth of Field
Decide whether a side angle or flat-lay works best for the dish. Using a wide aperture to create depth of field will make your subject stand out from the background, adding focus and visual interest.Diffuse Shadows
Harsh shadows can detract from the brightness of the image. Use reflectors or white cards to bounce light and soften shadows, keeping your image airy and inviting.
For this blog, I wish to touch on composition, as this will lead a person into a photo. It helps create the mood per picture. Composition is used in landscapes, still life, and many other genres.
These are the two composition rules for food photography:
Triangles
Rule of thirds
The main two angles to play with are shooting from the side or above. This is to show the range of food and drinks provided, so consider which makes the dishes or drinks more advertising or appealing.
Triangle is known as the golden triangle because it consists of a diagonal line across the frame. It also has two lines at the corners that meet along the long line at right angles. This means the main food dishes need to be placed where the lines meet, as they are the points of interest.
Check out these examples

The rule of thirds divides a photo into 9 squares, 3 across & 3 down. With this grid, you can build a composition layout, using props and food. This will help create balance and draw the viewer’s eye to certain points in the picture.
Here are some examples of this composition


I have touched on the key elements of a light/bright mood picture. Now I have shown examples of two key compositions to use when setting up your own picture.
Next, let’s consider lighting, as this will create the mood.
Here are some lighting diagram setups that work with window lights or artificial lighting sources.
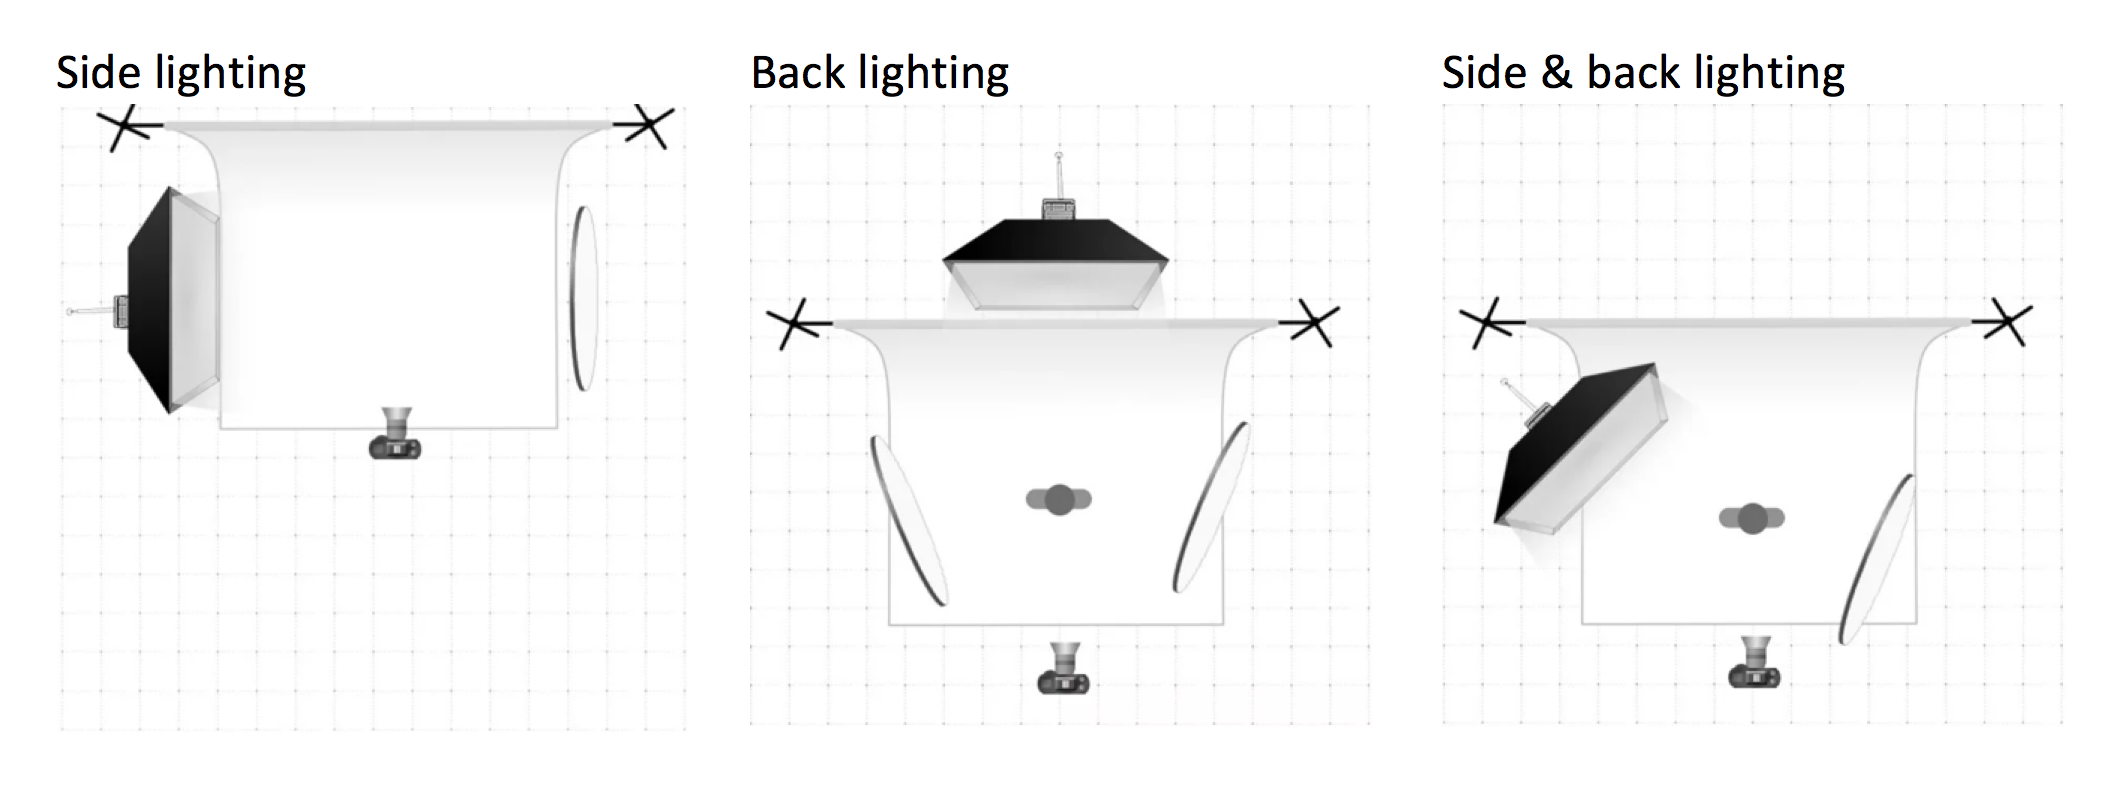
The above lighting diagrams show the camera, reflector, background and light source position. In the first image, the light source is positioned to the left. The 2nd image has the light as a backlight, which works amazingly with glass objects, and the 3rd shows two forms of lighting.
The lighting position per picture or mood is the same. However, for the light/bright mood picture, use reflectors to diffuse harsh shadows.

This image is nicely lit, but to make it a Light/Bright mood picture, I would work on diffusing the arrow-shadowed areas and I would use a neutral background sheet.
Why This Matters for Restaurants and Food Brands
For restaurants, cafes, or food product businesses, restaurant photography and product photography for restaurants aren’t just about capturing the food, they’re about creating an experience. Light mood photography conveys freshness, quality, and a sense of care, encouraging potential customers to engage with your brand online or in menus.
By focusing on light mood food photography, you can:
Highlight vibrant colours and textures in your dishes
Create consistent visual branding across social media, websites, and marketing materials
Enhance customer engagement through appetizing and professional imagery
Final Thoughts
Bright, light mood food photography is all about clarity, composition, and controlled lighting. When done well, it can elevate your restaurant photography and product photography for restaurants, helping your dishes look as good online as they do in real life.
What’s Next?
Enjoyed this post? Drop a comment below and let us know your thoughts!
Subscribe for More: Get monthly tips, tricks, and inspiration to elevate your photography skills.
Take Your Skills Further: Level up with one-to-one personalized tutorials and transform your food photography.
Book a Professional Session
Need professional imagery for your brand?
Collaborate with a specialist in restaurant photography, food photography in Northamptonshire, or product photography for restaurants to create stunning visuals